Boston Round Bottle Sizes: Dimensions, Fill Capacity, and Closure Fit
Replacing a Boston round bottle with another of the same capacity can change more than its appearance. The new bottle may need a different cap, leave a larger gap in a wraparound label, or become too tall for its carton once the pump is fitted.
The familiar round body, rounded shoulders and narrow neck describe a bottle shape, not a fixed set of dimensions. For glass Boston rounds, a useful size comparison starts with actual bottle measurements and then follows what happens when liquid, a closure and packaging are added.
Boston Round Bottle Sizes in Millimeters
The table below uses one real amber glass reference series. Its dimensions are approximate and exclude caps and dispensing components. They illustrate scale; they are not universal Boston round dimensions or a statement of available stock.
The capacity names are preserved as listed. The separate conversion column shows what the fluid-ounce figure means mathematically, rather than silently treating rounded catalog labels as exact equivalents.
| Listed capacity | US fl oz converted to mL | Bottle diameter × bare height | Neck finish |
|---|---|---|---|
| 0.5 oz / 15 mL | 14.79 | 25 × 68 mm | 18-400 |
| 1 oz / 30 mL | 29.57 | 31 × 79 mm | 20-400 |
| 2 oz / 60 mL | 59.15 | 39 × 94 mm | 20-400 |
| 4 oz / 120 mL | 118.29 | 48 × 112 mm | 22-400 |
| 8 oz / 240 mL | 236.59 | 60 × 138 mm | 24-400 |
| 16 oz / 480 mL | 473.18 | 75 × 168 mm | 28-400 |
| 32 oz / 960 mL | 946.35 | 94 × 210 mm | 33-400 |
In this series, moving from 8 to 16 oz adds about 15 mm to the diameter and 30 mm to the bare height. Capacity doubles, but neither external dimension doubles. The larger bottle therefore needs more width and height, while the closure adds its own space requirements.
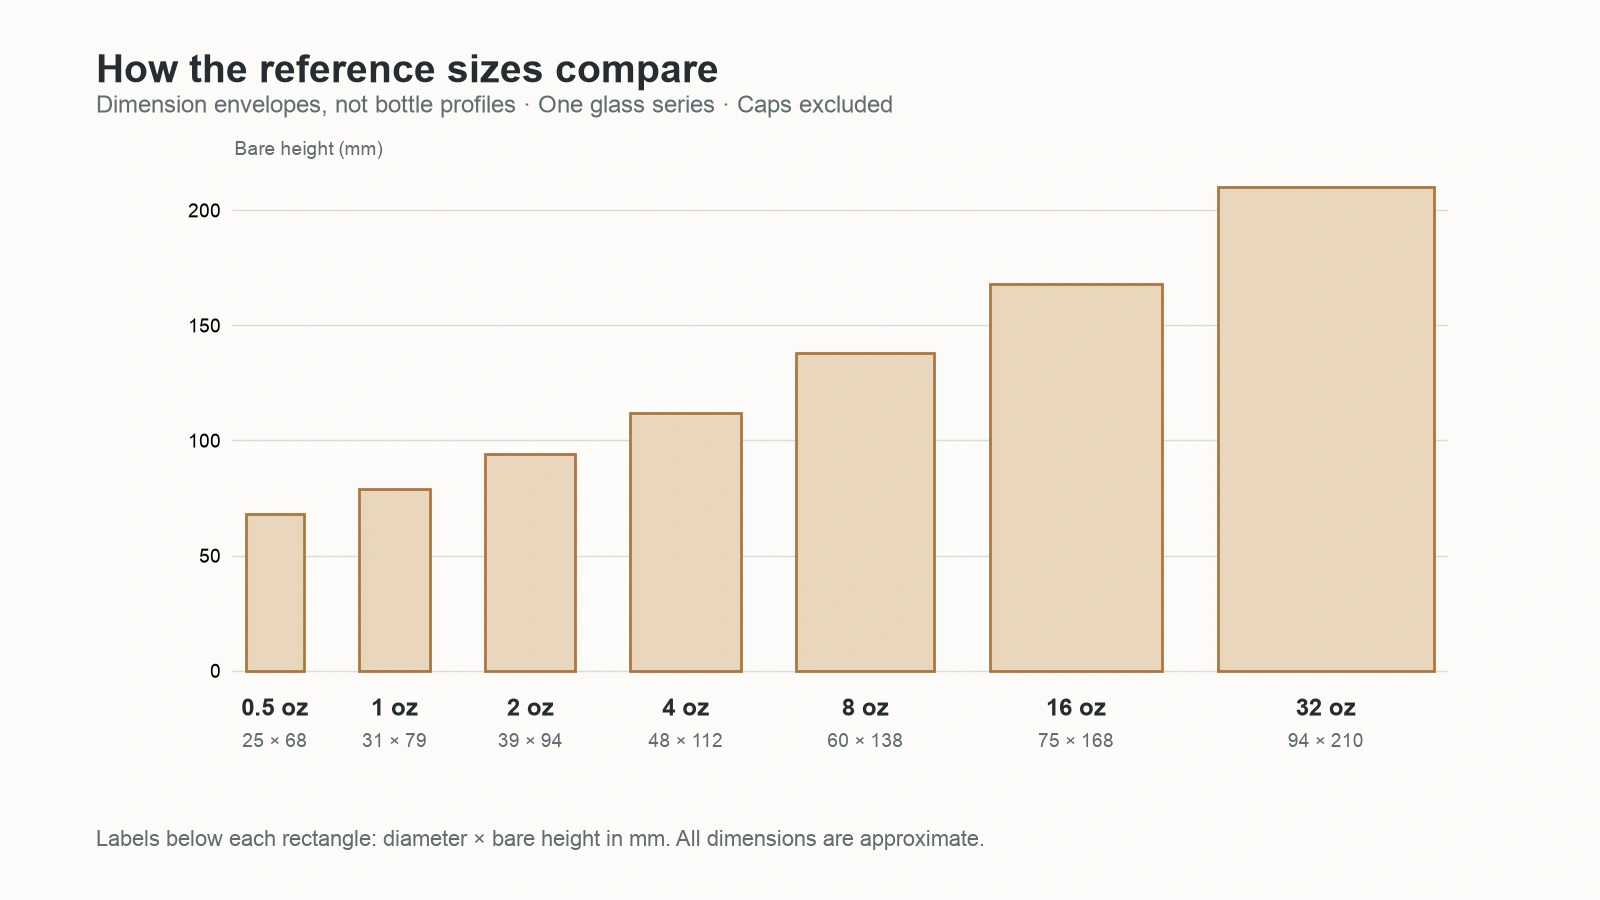
Other glass models can have different proportions and finishes at the same nominal capacity. Amber, clear or another color does not by itself establish those dimensions.
What changes between two 8 oz bottles?
Consider these two separate clear glass references. Both are listed as 8 oz with a 250 mL brimful capacity, yet their neck finishes differ.
| Specification | Reference A | Reference B |
|---|---|---|
| Bottle diameter | 59.92 mm | 60.33 mm |
| Bottle height | 136.35 mm | 138.10 mm |
| Neck finish | 24-400 | 28-400 |
The diameter differs by only 0.41 mm and the height by 1.75 mm. Those small body differences are less decisive than the change from a 24-400 to a 28-400 closure interface.
If an existing package uses a 24-400 cap or pump, Reference A preserves that nominal finish and is the more direct starting point for reusing it. Reference B calls for a 28-400 component. Neither choice is fully validated by the finish code alone, but the comparison already identifies which replacement changes the closure requirement.
The same capacity and a similar silhouette do not make two bottles interchangeable.
Nominal Capacity, Fill Volume and Brimful Capacity
A capacity label names the bottle. The target fill is the liquid volume the package must actually contain. Brimful or overflow capacity describes the bottle's capacity up to its opening, before allowing for the intended closure and filling conditions. A separately stated filling capacity is another useful field: it should not be replaced by the product title or a unit conversion.
For US units, 1 fl oz is approximately 29.5735 mL. Thus, 2 US fl oz is about 59.15 mL and 16 US fl oz is about 473.18 mL. These calculations do not establish the brimful capacity of a particular bottle. Imperial fluid ounces are different, and weight ounces cannot be converted into a liquid volume without the liquid's density.
This is why a bottle labeled “16 oz / 500 mL” needs more than a conversion check. Its specification may define a 500 mL fill, or the title may be a rounded product name while the filling field says something else. The two 500 mL candidates later in this guide show that distinction in practice.
Why the closure affects available space
A pump housing, dip tube or dropper enters the bottle. Parts below the liquid surface occupy space and can raise the liquid level when inserted. Subtracting the planned fill from the empty bottle's brimful capacity gives an initial volume difference—not guaranteed headspace after assembly.
A useful sample check follows that sequence: add the target volume of the intended liquid, insert the complete dispensing component, then close the bottle normally. Liquid forced out during insertion shows that the current combination does not accommodate that fill as assembled. If the fill is fixed, change the bottle or suitable component; reducing the amount would change the product requirement.
No overflow is only one result. It does not establish a reliable seal, suitable dispensing or transport performance. Moving to a larger bottle can create more space, but it can also change the liquid level, the distance to the base, the label area and the carton. It solves a capacity problem only if the rest of the package still works.
Match the Closure in Three Places
A cap, dropper or pump must connect to the neck, seal at the intended surface and perform its job inside the bottle. These are linked requirements, but success at one does not prove the other two. A pump that screws on can still have an oversized housing or a dip tube that stops too far above the base.
1. The thread and the internal opening
In a finish such as 20-400, the first number identifies the nominal thread-diameter size; the second identifies the finish series. It does not mean the opening through the glass is 20 mm wide.
On a neck drawing, T is the outside thread diameter and I is the internal opening diameter. A pump's internal housing has to pass through I. Two bottles intended for the same nominal closure can still differ in the clearance available inside the neck.
Start with the complete finish and the intended bottle–closure pairing. A shared first number is insufficient to assume that, for example, 24-400 and 24-410 components are interchangeable. A specifically established pairing is more useful than a rule based only on the printed numbers.
2. The sealing surface
With a lined cap or a gasketed pump closure, the sealing element needs to contact the bottle's sealing surface. If the cap skirt reaches a neck bead or shoulder first, turning can stop before that seal is properly seated.
That explains a package that feels tight but does not seal: resistance can come from the wrong contact point. Tightening harder or fitting a longer dip tube does not correct this geometry. The remedy is a bottle–closure combination with the correct engagement and sealing relationship.
3. The component inside the bottle
A screw cap closes the opening; it does not need a tube to reach the liquid. A dropper uses a bulb and rigid tube to draw a small amount. Pumps and sprayers typically use a dip tube to bring liquid into their dispensing mechanism. Changing bottle depth therefore affects these components differently.
For a pump or sprayer, dip-tube length may be specified as FBOG: from the bottom of the gasket to the tube end. The top of the pump head is not that starting point, and the bottle's external height is not its internal depth.
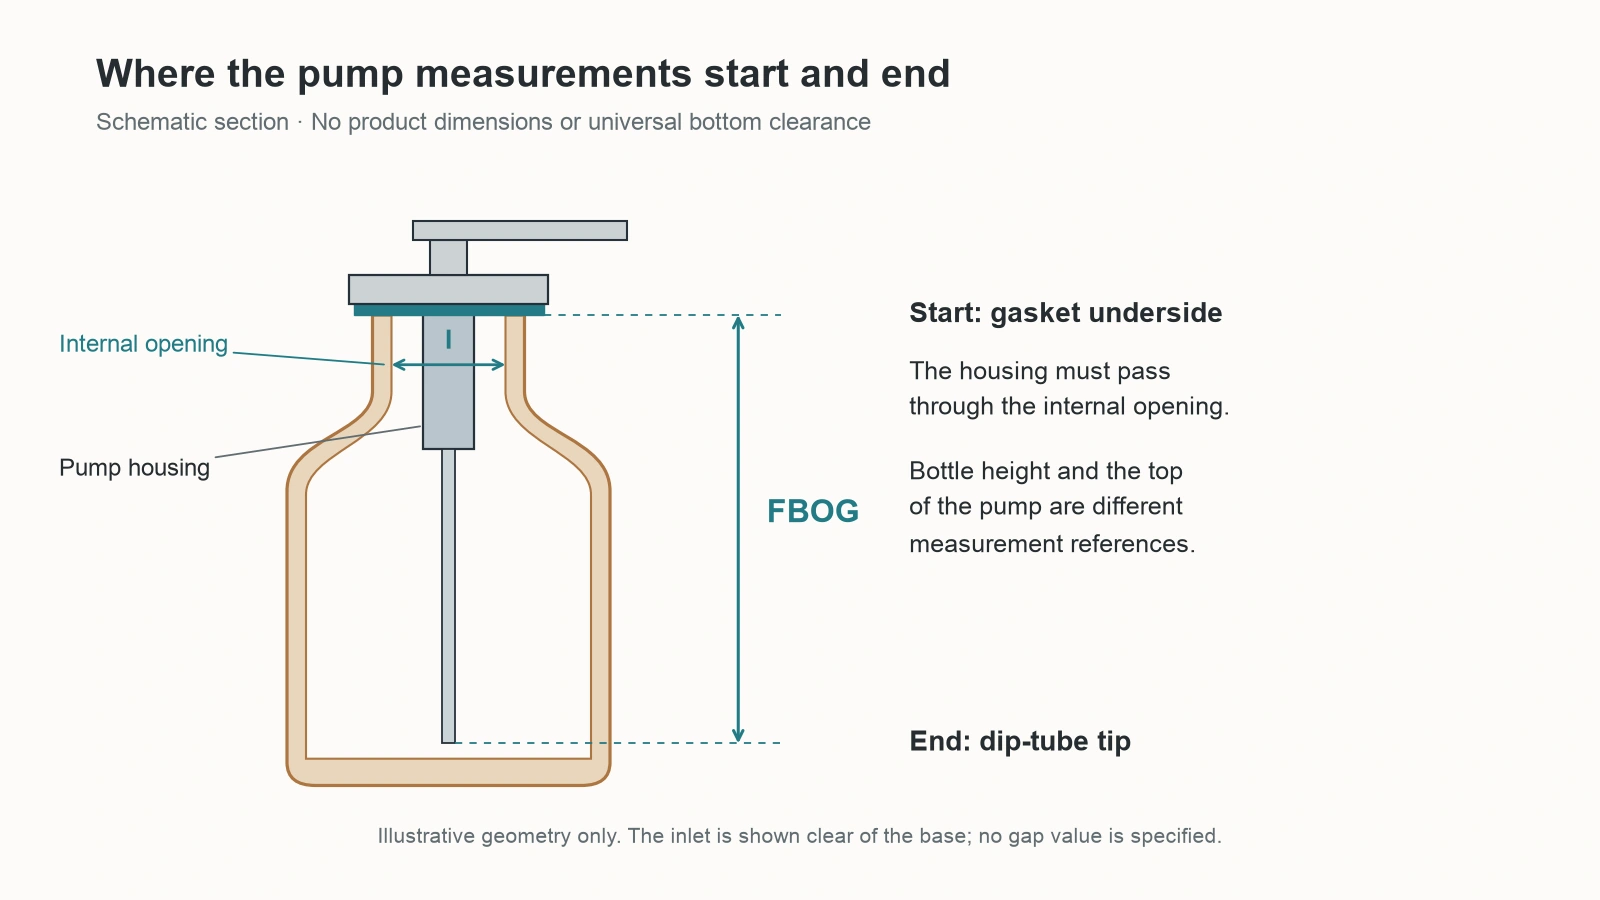
A tube that ends too high leaves liquid below its inlet. A tube end pressed shut against the base can obstruct flow even though it reaches the bottom. Some flexible sprayer tubes curve toward the wall; a thicker pump tube needs an arrangement that keeps its inlet open. There is no single cutting length or bottom gap suitable for all of them.
A rigid glass dropper needs its own length and internal-depth comparison. Do not transfer a flexible dip-tube trimming method to glass, or expect a larger-capacity bottle to work with the old dropper simply because the thread is unchanged.
Turn Bottle Dimensions into Label and Carton Dimensions
A label wraps around part of the bottle body. A carton surrounds the assembled package. Their dimensions must therefore come from different boundaries: the straight labeling area for one, and the complete outer envelope for the other.
Labels: use the straight body, not the full height
One documented 2 oz glass bottle is approximately 94 mm tall, but its specified straight label area is only 50.8 mm high. The rounded shoulder and curved base account for much of the difference. A rectangular label extending onto those curves can lose the flat cylindrical surface it was designed to follow.
For width, the starting geometry is:
Circumference = π × diameter at the labeling position.
The widest point on the bottle is not necessarily the diameter at that position. A label layout also has its own gap or overlap. For example, an 8 oz reference bottle lists a 61 mm diameter and a 188 mm label width, while π × 61 is approximately 191.64 mm. The published label width and the calculated outer circumference are different measurements; the difference is not a universal gap allowance.
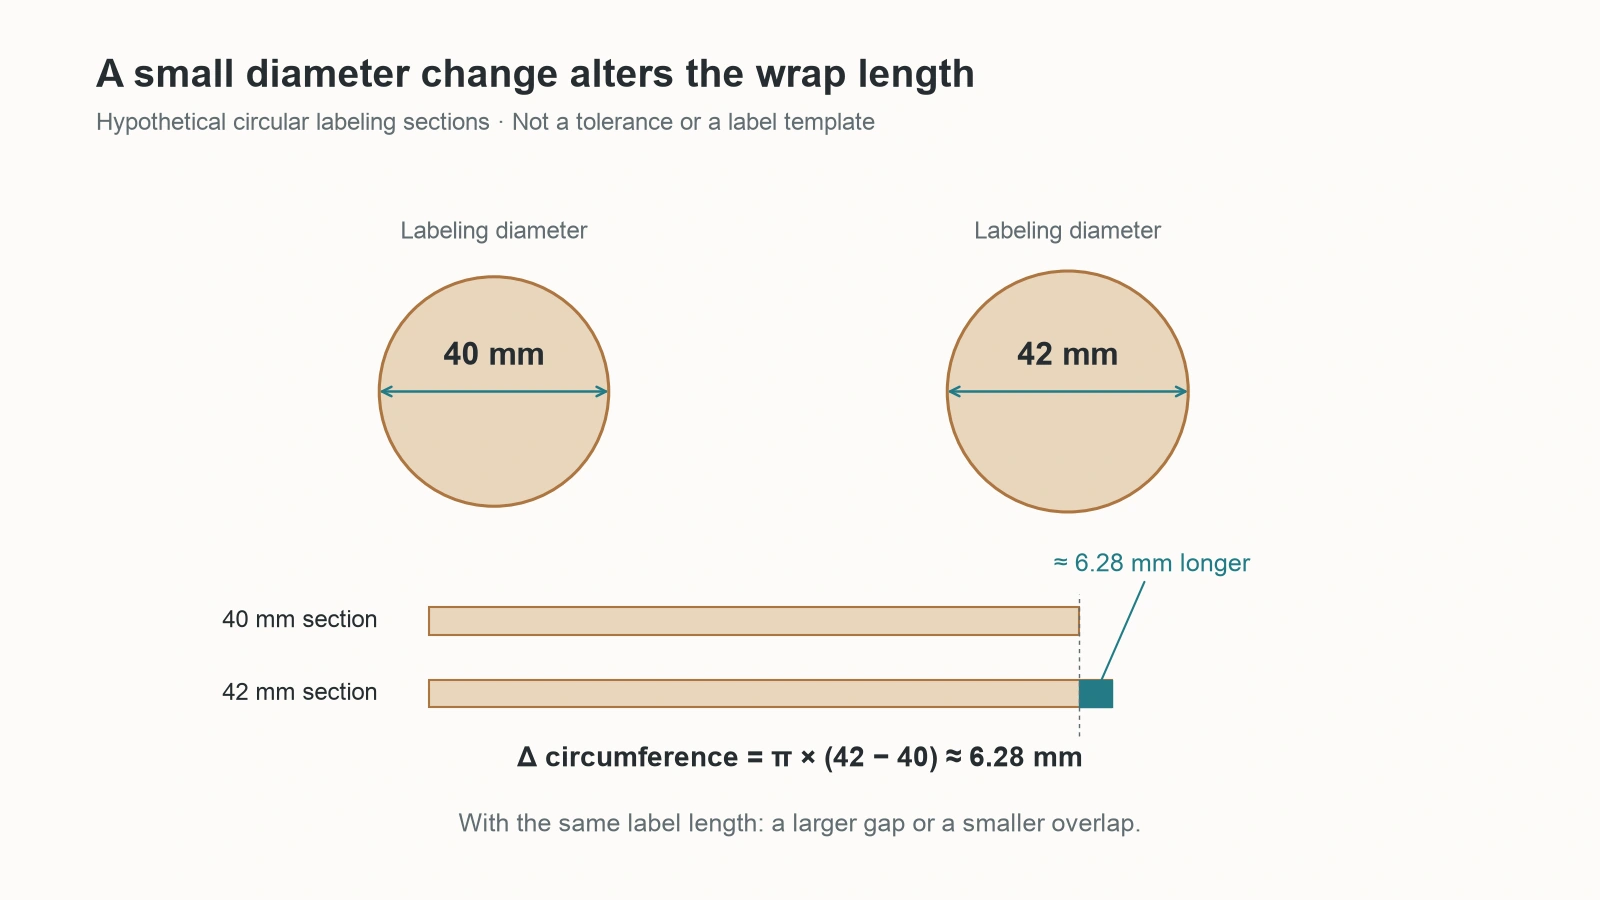
A simple hypothetical change shows the effect on existing artwork. If the labeling diameter increases from 40 to 42 mm, circumference increases by about 6.28 mm. With the old label length unchanged, the end gap grows—or the overlap shrinks—by that amount. A bottle can still be sold under the same capacity name while the label no longer meets the intended layout.
Cartons: measure the assembly in its shipping state
Use the bottle with its actual cap, dropper or pump fitted. Adding bare-bottle height to the full length of a pump overcounts the parts inserted inside the bottle. The spout, overcap and any locking arrangement also belong to the outer envelope.
A pump may ship locked down and be taller when released for use. A carton sized for the locked assembly does not tell you whether the working pump fits below a shelf. At the sink, the spout needs a suitable discharge position and the user needs space to press the actuator.
Packaging dimensions also need to accommodate the selected protective insert and dimensional variation. In the 2 oz reference drawing used for the label example, bottle height and diameter each carry a tolerance of ±0.035 in, approximately ±0.89 mm. A space that just accepts the nominal bottle has not allowed for the upper end of that drawing's range. This is a model-specific tolerance, not a recommended carton clearance.
Two Worked Bottle-Selection Examples
The following examples bring capacity, components and space together. They use published bottle specifications to choose a direction; they are not tested bottle-and-dispenser kits. The useful result is both a preferred starting point and an explanation of what would make it unsuitable.
A 60 mL glass dropper package
Suppose the required fill is 60 mL. A separate 2 oz glass reference has a 63.8 mL brimful capacity, a 20-400 finish, a 38.6 mm diameter and a 93.66 mm bottle height.
Its initial volume difference is 63.8 − 60 = 3.8 mL. That makes it a candidate worth evaluating with a suitable complete 20-400 dropper. It does not prove that 3.8 mL will remain above the liquid after the dropper is inserted. The approximately 0.85 mL difference between 2 US fl oz and 60 mL is a unit-conversion issue, not the bottle's available headspace.
Keep the required 60 mL fill fixed during the comparison. If inserting the intended dropper pushes liquid out, choose a bottle or compatible component that accommodates the assembly at that fill. If assembly fits but the dropper cannot draw liquid at the intended low level, compare the dropper's reach with the internal bottle depth. A suitably longer dropper or a different bottle geometry addresses that problem more directly than automatically increasing capacity.
If the existing dropper must be retained, its sealing position and reach become constraints on the replacement bottle. If the bottle becomes wider, the label circumference changes; if it becomes deeper, the old dropper may leave more liquid beyond reach. Final label and carton dimensions follow the selected assembly, rather than the “2 oz” name.
Choose the 60 mL package around the filled, fitted dropper assembly—not around the closeness of 2 oz to 60 mL.
A 500 mL countertop pump package
Now suppose the target is 500 mL with a pump for use beside a sink. Two actual bottle listings provide the following capacity fields; both specify a 28-400 neck finish.
| Capacity field | Candidate A | Candidate B |
|---|---|---|
| Product description | 500 mL / 16 oz | 500 mL / 16 oz |
| Stated filling capacity | 473 mL | 500 mL |
| Stated brimful or overflow capacity | 506 mL | 510 mL |
| Arithmetic difference above a 500 mL fill | 6 mL | 10 mL |
Candidate B is the stronger starting point for a fixed 500 mL fill because its filling field explicitly matches the requirement.
Candidate A's title does not override its stated 473 mL fill. Its 506 mL brimful figure does not prove that 500 mL is physically impossible, but it also does not validate 500 mL with a pump installed. Neither the 6 mL nor the 10 mL difference is guaranteed assembled headspace.
The next choice is a pump suitable for the intended liquid, with a compatible 28-400 closure, a housing that fits through the internal opening and a dip tube suited to the bottle's depth. Then compare the complete working height and spout position with the sink area, and the locked shipping envelope with the carton. The bottle listings alone do not establish those assembled dimensions.
To make the space decision concrete, consider a hypothetical shelf opening 220 mm above the counter. Suppose an assembled pump bottle is 205 mm high in its working state and this example reserves another 20 mm for operation. It needs 225 mm, exceeding the opening by 5 mm. These dimensions are teaching assumptions, not measurements of Candidate A or B; the 20 mm allowance is not a recommended standard.
If a suitable alternative pump reduces the working assembly height to 195 mm, the same calculation becomes 195 + 20 = 215 mm, leaving 5 mm within that assumed space budget. This passes the example's height comparison only: actual operation, closure fit, liquid handling and the 500 mL fill still have to work. The lower exposed assembly addresses the height problem while retaining the required fill. Putting less liquid into the original bottle would not reduce its external height.
If 500 mL is essential, a shorter bottle with suitable capacity is another direction; a smaller-capacity bottle is an option only if the fill can change. If width is the problem, a narrower bottle may help, but the resulting height needs its own comparison.
This also explains the cost of a replacement. A cheaper bottle that changes the finish, label area and assembled envelope can require a new pump, revised labels and different cartons. Compare the parts that actually change, rather than treating the bottle price as the whole package cost.
A useful final specification can now explain the choice: the bottle accommodates the required fill with the selected closure, the dispenser reaches and handles the liquid, and the label and carton fit the resulting assembly. The capacity name remains a convenient starting point; the relationships between those parts determine whether the package is suitable.